Tuesday, 29 January 2013

Diamonds Are a Girl's Best Friend

I have been noticing how many bloggers have highlighted Ferm Living's new collection, with some items even appearing in Elle Decoration last month. They really do have some lovely stuff.

(c) Ferm Living

I really love this pattern, found on cushions, shower curtains and even tea trays.

(c) Ferm Living

I particularly like this tray.

(c) Ferm Living

But where had I seen that pattern before? Lo and behold I looked around my studio and found this painting I painted two years ago.


Sometimes I'm behind the times, but sometimes I'm a little ahead!

See all products at Ferm Living.
See more of my art on my Flickr page.


Monday, 21 January 2013

new prints from normal

Here at normal designs we have been working on some limited edition prints of our first design there is no such thing as normal, which can be seen on our eco friendly bags around Brighton.


Here it is framed. We have also been working on some new designs, currently at the testing stage. This one is inspired by listening to a lot of Radiohead:


Here is an old favourite, which we have yet to print.


We are thinking of producing limited edition screenprints, and also an unlimited run of giclee prints for £10 each. What do you think? We are also looking at card printing. Here is a design for Valentine's day:


all designs are (c) normal designs.

Please tell us what you think in the comments section below, we always appreciate feedback! Thanks for looking.

Monday, 14 January 2013

arty shelves

Here is a very quick How To...make room for more art in your life. Here's the before:


Some of our art collection, including work by Tori Brown, Paula Day, Dominic from Luton, Paul Griffiths and Janette Staton, as well as some drawings by my son. One trip to Ikea later, with a voucher which we got for Christmas and, among other things, we purchased four long picture shelves.
First, fill and sand any holes. Touch them up with paint, then measure the walls and find the mid-point.


Using a spirit level, mark through the holes in the shelf with a pencil and make some guiding holes in your wall. Our walls are stud partitions, so I glued the back of the shelves with No More Nails and just used wood screws.


The first two shelves are up. More measuring and you're ready for the next two. And here's the finished result.


Now there's room for 100% more art, including some small sculptural objects and letters. And happily, the sun came out too!

Monday, 7 January 2013

First Ikea Hack

Happy new year to you all. Here at normal designs' HQ we have taken down the decorations and our sustainable bamboo tree. We didn't want to throw it away, so we are going to keep it in the garden and grow some sweetpeas up it. We have begun to spring clean, which has also involved doing those little projects that I have been promising to do all last year!


I found these Lack shelves from Ikea in the bin room, but as I couldn't fix them to our stud partition walls, I have been keeping them ever since until I found a use for them. Hence this, my first Ikea Hack. I measured about a foot from either end of one shelf and cut off either end. This was extremely quick and easy, as they are hollow inside.


Then I sanded down the rough edges and simply glued them to either end of one shelf. I glued the other shelf to the top and voila! One shoe rack, which fits perfectly under the coat rack in our hall.


I may yet paint the whole thing white, but for the moment, here it is.

Monday, 24 December 2012

Sunday, 23 December 2012

Baking Mad

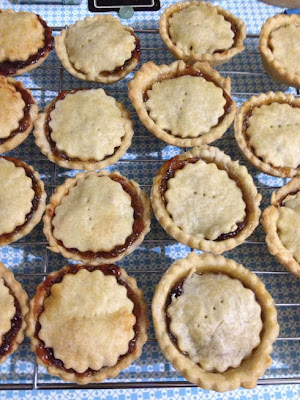
Had a mad day's baking yesterday, ready for all the guests we are expecting over Christmas. Whipped up some more mince pies, as the ones I made last weekend were all eaten rather quickly!


Some were a little smaller than others, due to the slightly different sizes of our baking trays. But they all still look great packed in a nice tin for Christmas. They will just need heating through and a light dusting of icing sugar on the day.

One thing I have never made from scratch before is sausage rolls. You can buy ready to roll flaky pastry, but I wanted to try making it myself, so followed Delia's really simple recipe for quick flaky pastry, which basically involves freezing and then grating the fat. Roll the pastry out into an oblong shape, cut into three strips then roll out your sausage meat. Our butcher has some lovely organic sausage meat which really does have no rubbish in it. Do try and support your local high street shops.


Mix in some very finely chopped onion and a pinch or two of sage, then divide and make three rolls long enough to fill your pastry. Brush one edge of the pastry with beaten egg , then roll the other side of the pastry over the sausage meat and seal it. Cut every 2 inches, brush with egg and make a couple of holes in each one, and pop them in the oven for 20 minutes or so at gas mark 7. It's great fun to watch the pastry rising though the oven door (if you have nothing better to do!)


Finally we made some cheese straws. Dead easy. Roll out more flaky pastry, cover one half with grated cheese then fold the other half over. Roll out again, squashing the cheese in the middle of the pastry. Cut into strips, twirl them around and pop them on a greased baking tray. Brush with a little egg or milk, and maybe sprinkle with some sesame or poppy seeds. Bake on gas mark 6 for about 20 minutes, until they are golden brown.


Happy baking everyone. I'm off to pick up some wine to mull. Hope you all have a very Merry Christmas.

Friday, 21 December 2012

...Tum-tee-tum delightful!

So, I said I would show you how to make an origami Santa...You need a square of paper, red on one side and white on the other. Use some scrap paper from the offfice and cover any printing with red paint (we also sprinkled some glitter!) Then cut or tear out a square.


Next fold the square again, so there is a cross from corner to corner.


Then fold both sides into the centre, as you would a paper aeroplane.


Turn that over, and bring down the white bit of paper to the very centre.


Then fold it over again - this makes the brim of Santa's hat.


Turn over once more amd fold Santa's hat back up, leaving the bottom of his white beard at the bottom of his body.


Finally turn the two flaps behind him, and draw a little face:


He can now stand up and several could be very useful as table decorations, or place holders. Or you can punch a hole in his hat and hang on the tree like we did!

Happy holidays!